IBUYPOWER Gaming PC Wouldn’t Power On: Updating an ASUS B650 BIOS to Ver. 3881

Problem: IBUYPOWER prebuilt Gaming PC would not power on. Cause: CMOS/BIOS issue. Fix: Reset CMOS and update the BIOS. Result: PC powered on and booted normally.


PC Won’t Turn On
 
I recently worked on an IBUYPOWER Windows 11 gaming computer that initially appeared with no activity: no lights, fans, or anything. Pressing the case’s power button wouldn’t start the computer. This was a fairly powerful prebuilt IBUYPOWER PC that had an ASUS PRIME B650M-A AX II motherboard with an AMD Ryzen 9 7900X 12-core processor, 32GB of DDR5 memory and a 2TB Solidigm NVMe SSD. Once the computer Clear CMOS/RTC pins where jumpered per ASUS instructions on the ASUS website it came on. I was suspicious it needed a BIOS update (or a PSU).
 
Finding a Very Old BIOS
 
The computer was running, I entered the ASUS BIOS and found that the PRIME B650M-A AX II was running BIOS version 2413, dated February 2, 2024.The system correctly detected the Ryzen 9 7900X, 32GB of DDR5 memory and its 2TB Solidigm NVMe SSD.I checked the available BIOS versions for this exact motherboard and found BIOS version 3881, dated June 17, 2026.
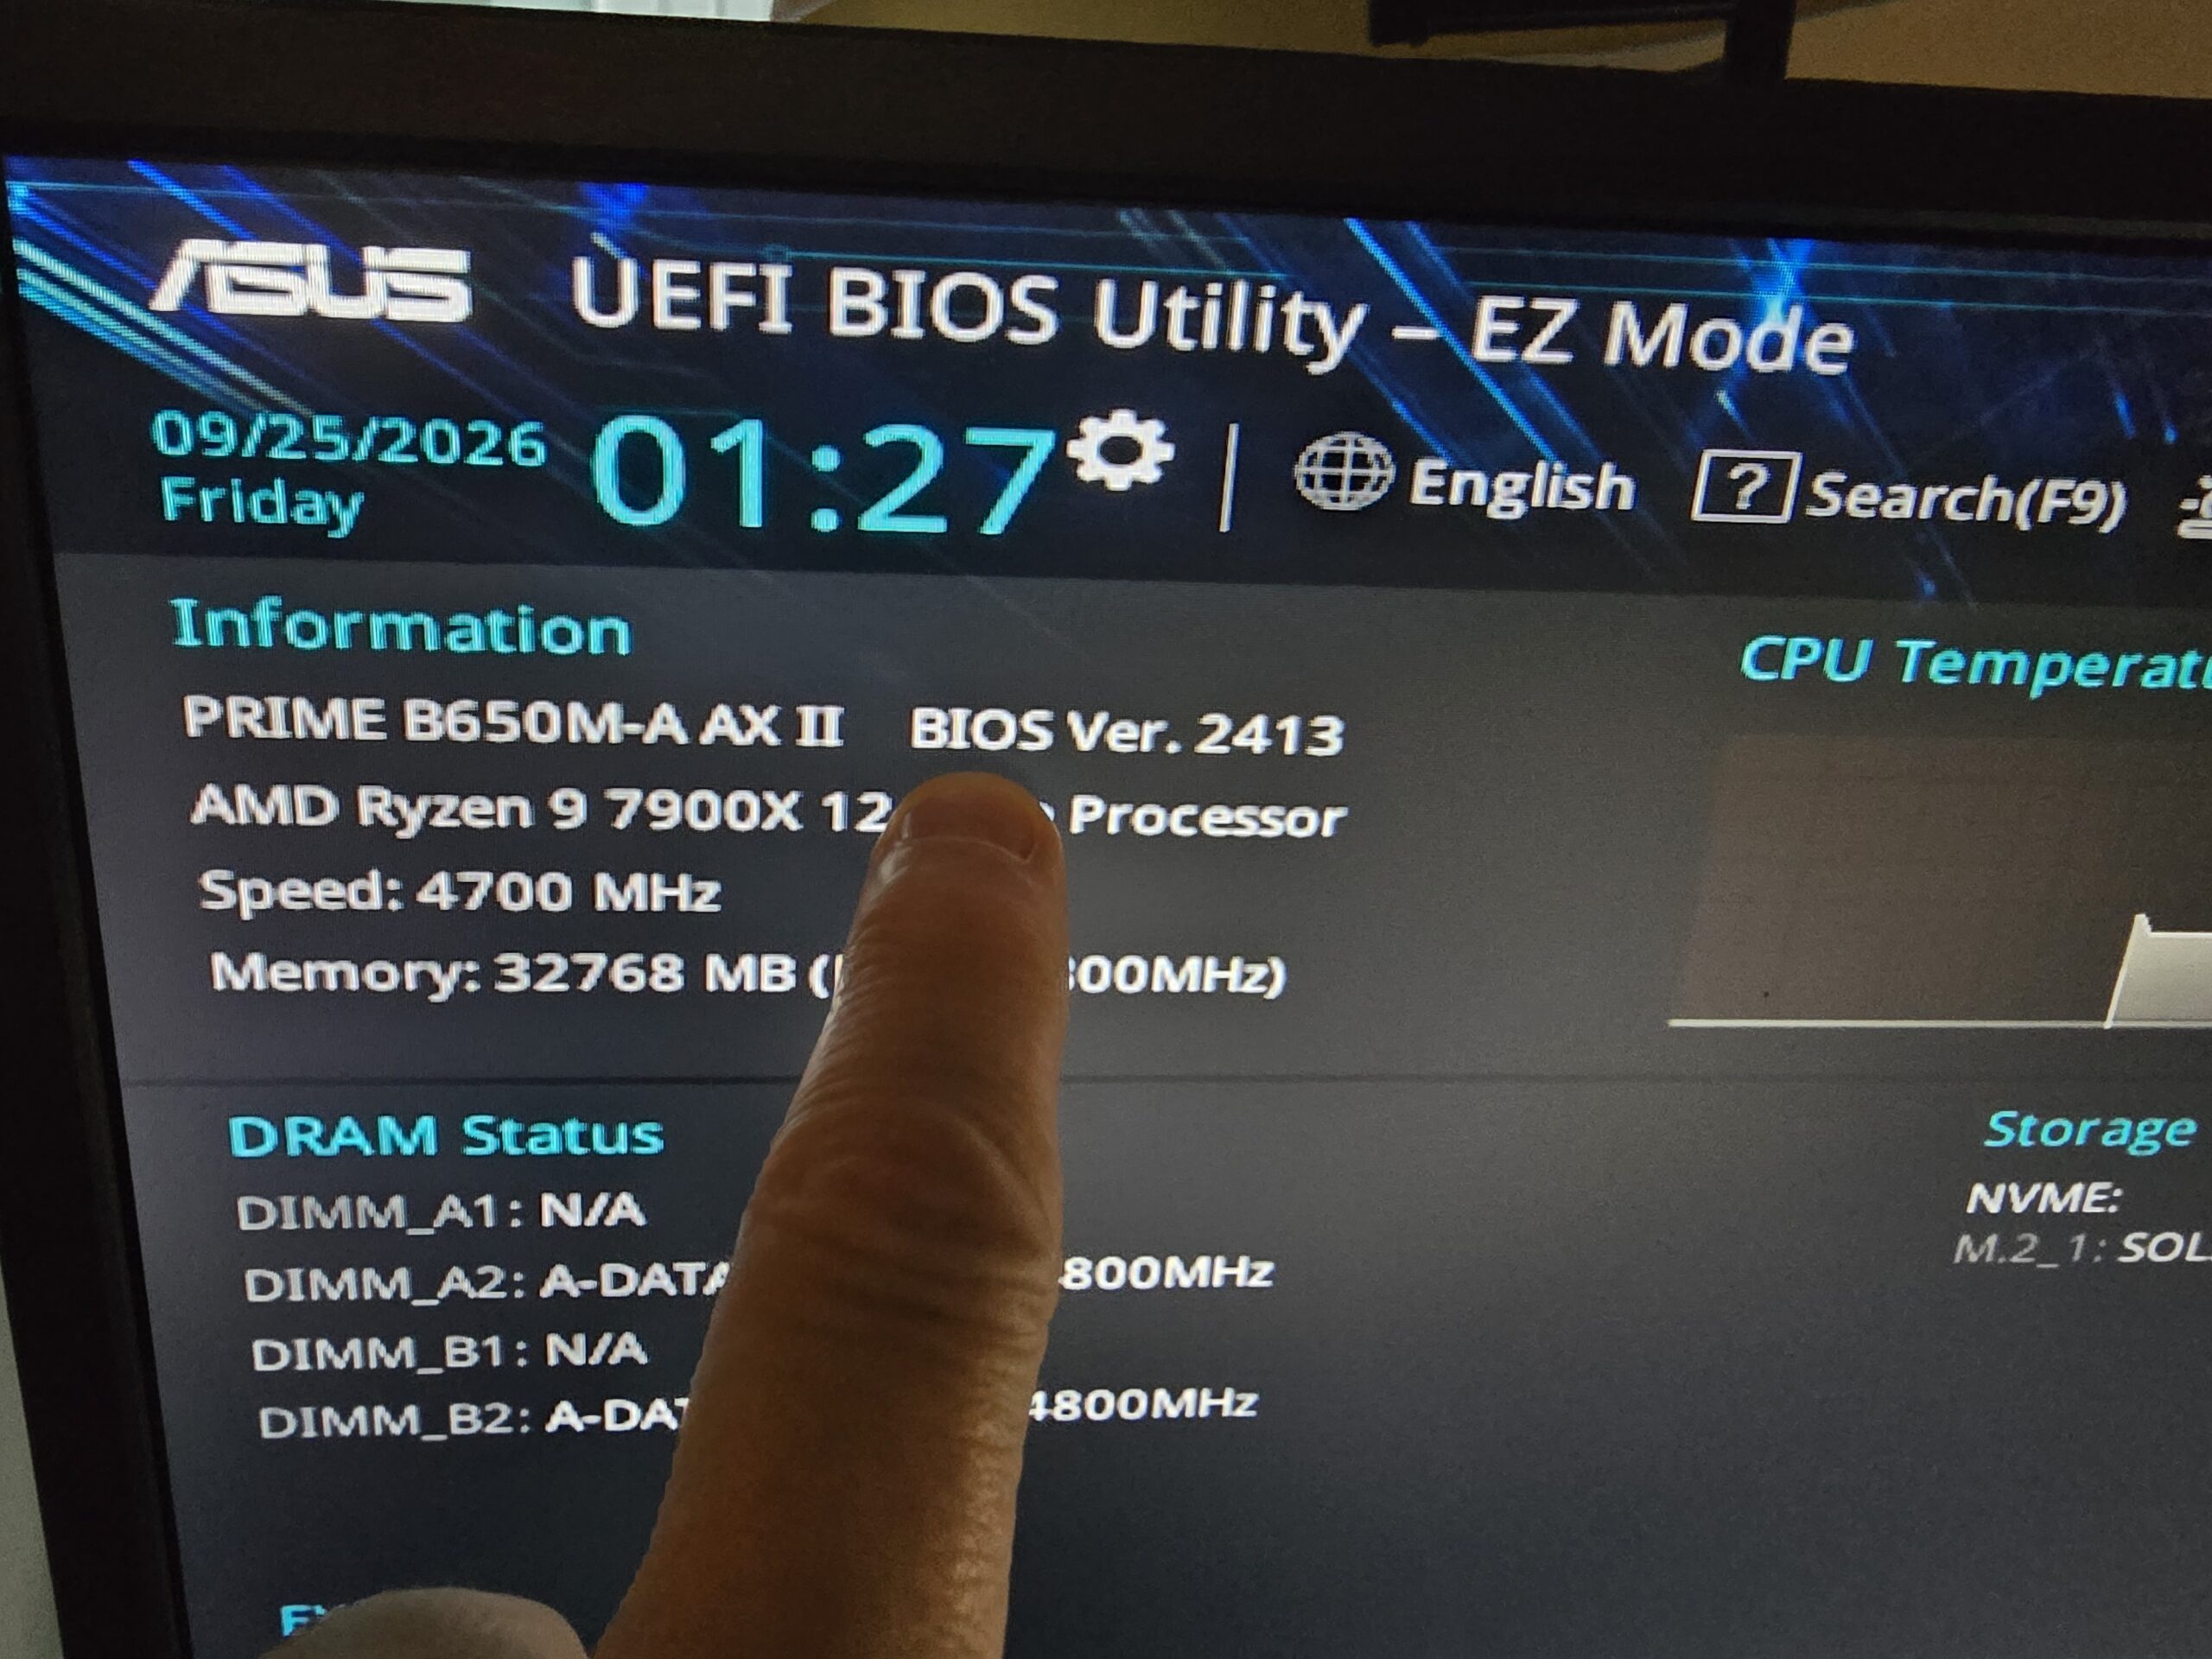
 
That represented more than two years of BIOS revisions. On a modern AMD AM5 platform, BIOS updates can include changes involving compatibility, memory support, stability, security and AMD AGESA firmware.
 
With the computer now operational enough to work on, bringing the motherboard firmware up to date made sense.
 
Getting the Correct BIOS
 
Motherboard model numbers are especially important when updating firmware.
 
This motherboard was specifically an ASUS PRIME B650M-A AX II. ASUS makes several B650 motherboards with similar names, so I verified the exact model before downloading anything.
 
Get the newest version of BIOS you can get that is non-BETA. See the photo inserted for a visual of this. I downloaded BIOS 3881. There was also a BETA version that was newer but I don’t want to do a BETA version of BIOS so I used the last Non-BETA version and extracted the ZIP file to a USB flash drive formatted in Fat32. Inside was the BIOS .CAP file, ASUS BIOSRenamer utility and a configuration file.
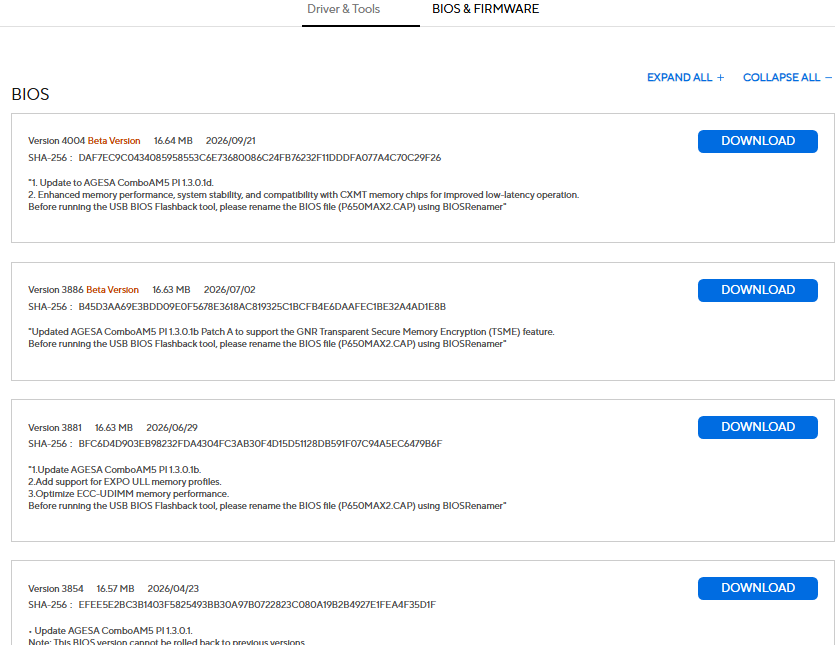
 
The BIOS file was:
 
PRIME-B650M-A-AX-II-ASUS-3881.CAP
 
You can ignore any other extraced files from the BIOS update you download from ASUS. The “cap” file is the only one you need. I copied it to the USB flash drive.
 
When the USB Drive Didn’t Show Up
 
I restarted the computer, entered the ASUS UEFI BIOS, switched to Advanced Mode and opened:
 
Tool → ASUS EZ Flash 3 Utility
 
Initially, the USB flash drive wasn’t appearing as expected.
 
It would have been easy to start troubleshooting the flash drive format, BIOS download or file itself. The actual problem was much simpler.
 
I hadn’t pushed the USB flash drive completely into the USB port.
 
Once I fully seated the drive, ASUS EZ Flash detected it and displayed the BIOS file normally.
 
It’s a good reminder that even when working on a complicated computer problem, it’s worth checking the simple things first.
 
Checking BitLocker and Loading Default BIOS Settings
 
Before updating the BIOS, ASUS warned me to back up the BitLocker recovery key and suspend encryption because BIOS or TPM changes can sometimes trigger a BitLocker recovery prompt. Instead of ignoring the warning, I rebooted into Windows and confirmed BitLocker was not enabled. ASUS also recommended loading the motherboard’s optimized defaults before updating, so I did that and returned to EZ Flash 3. I proceeded with the update.
 
Updating the BIOS
 
Once the BIOS update started, I left the machine alone.
 
Interrupting power while motherboard firmware is actually being written can potentially leave a computer unable to boot, so this isn’t the time to shut it down or start pressing buttons.
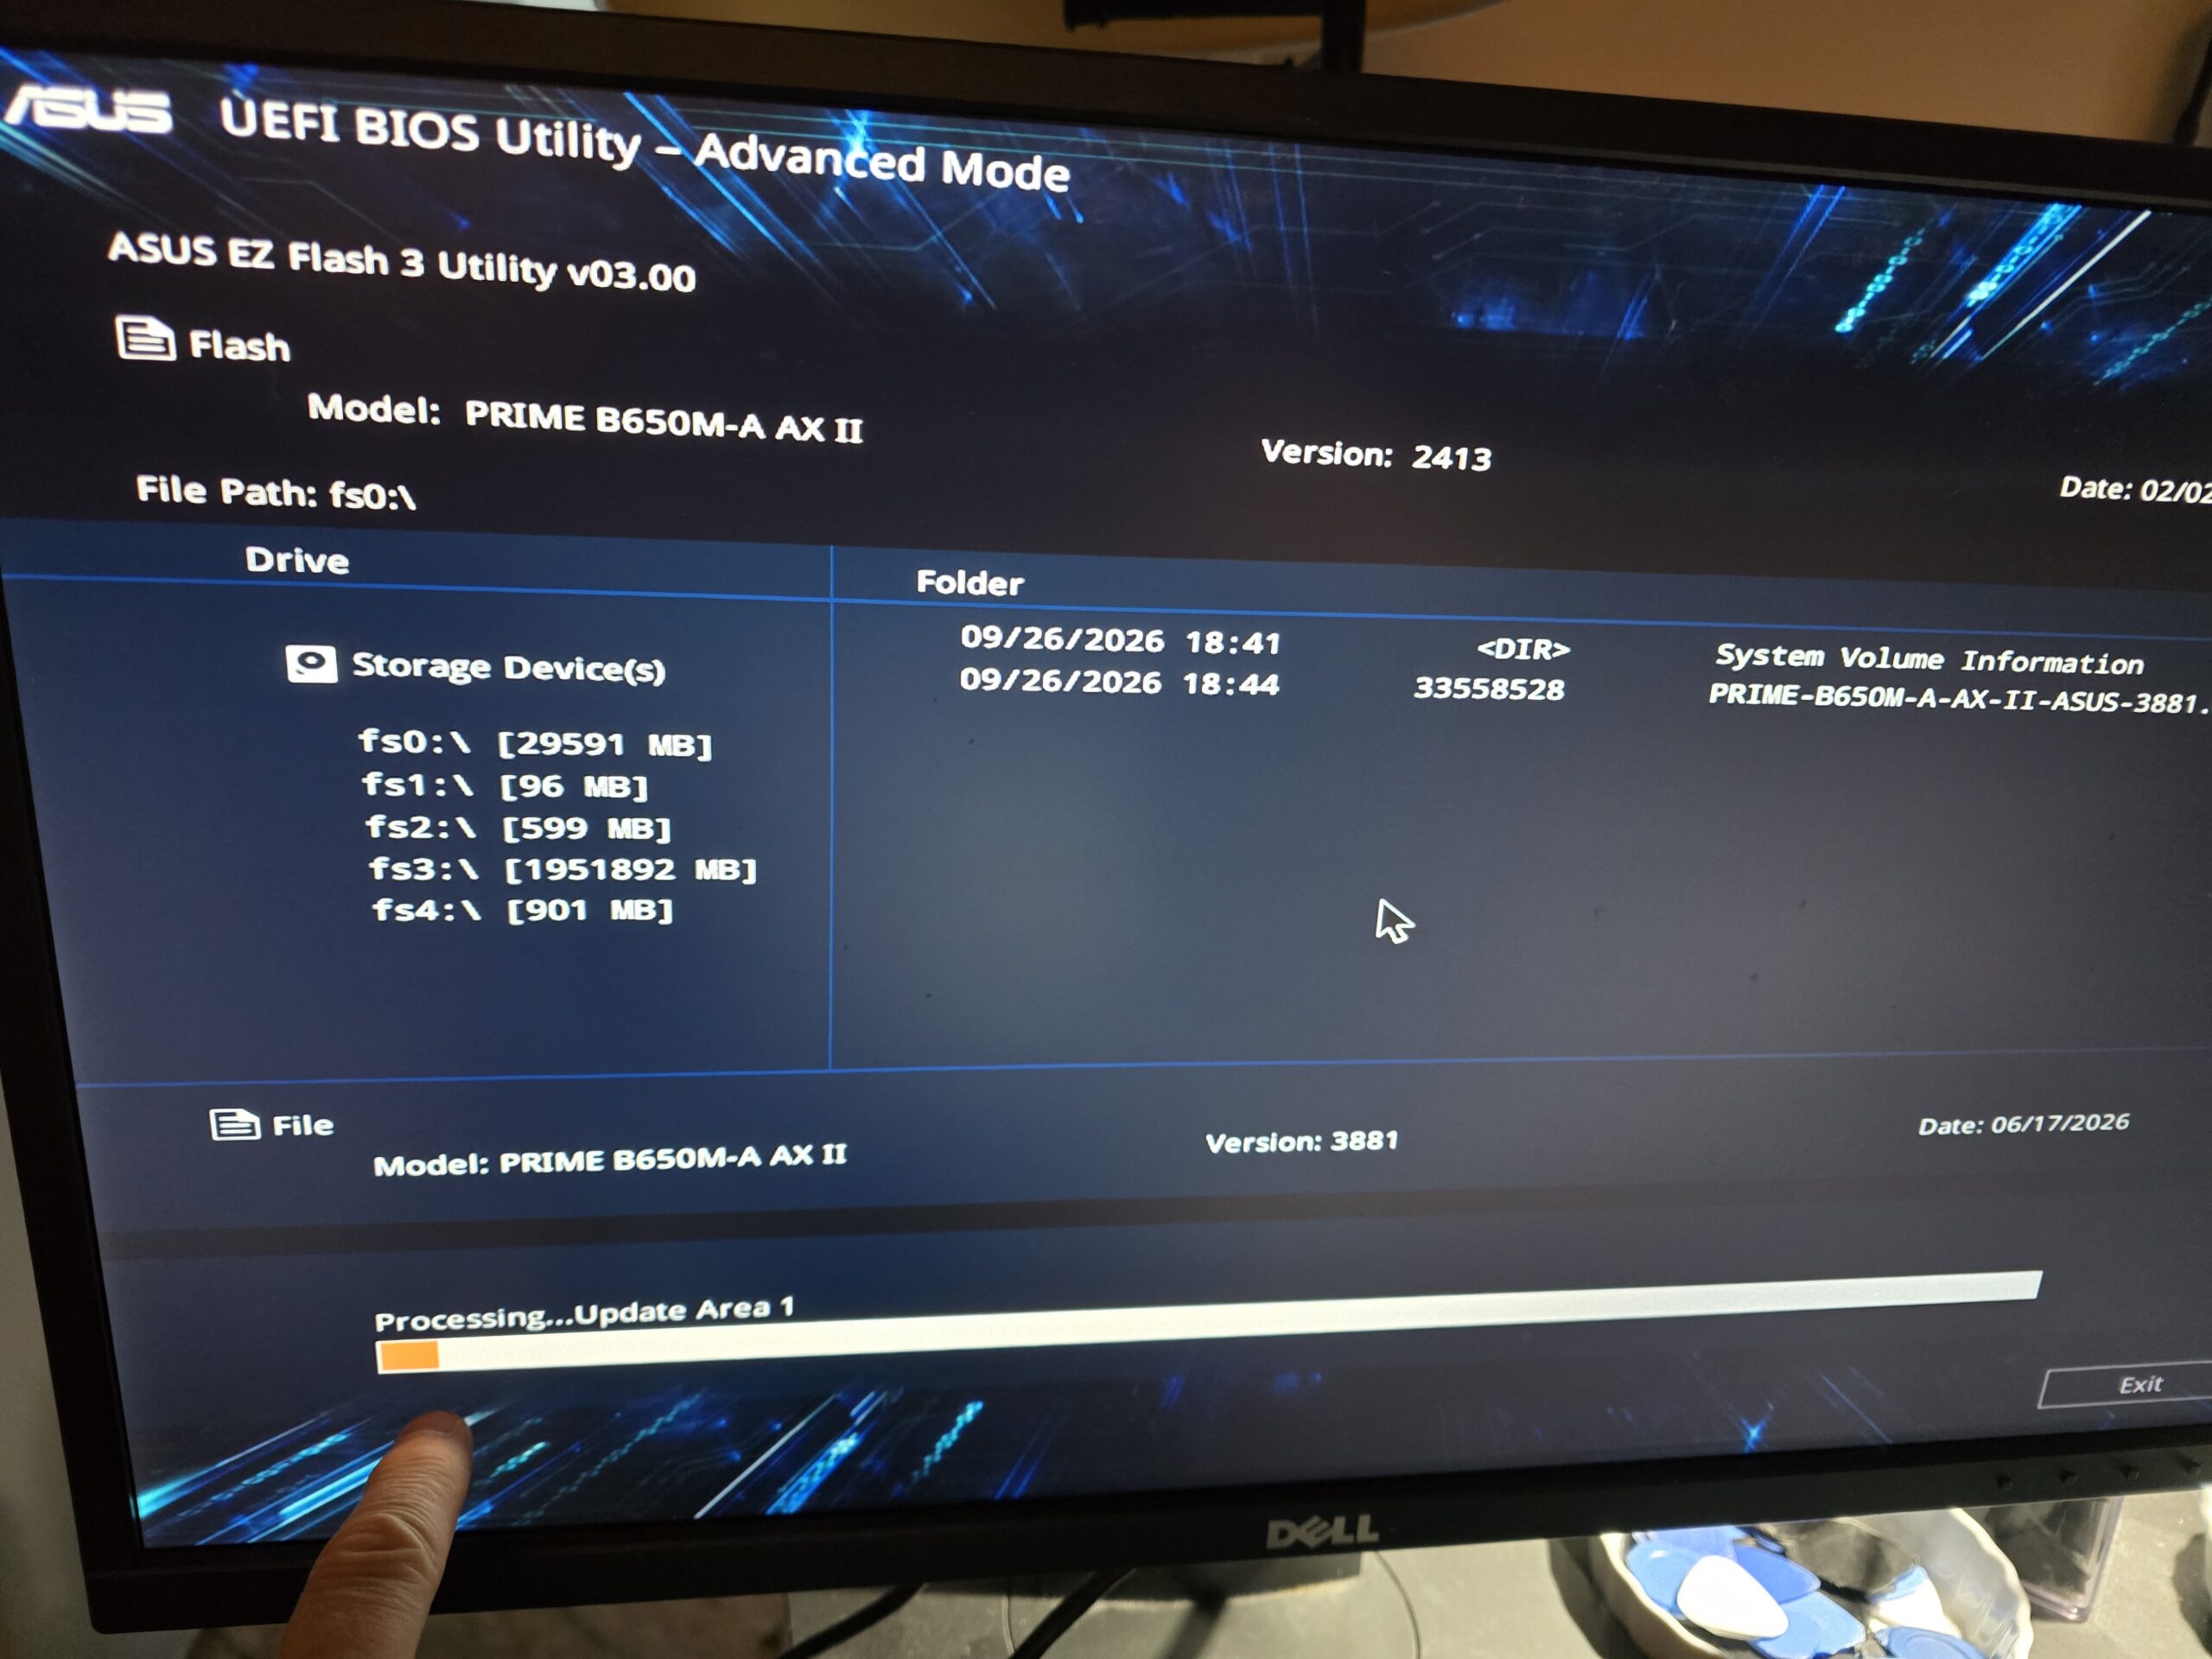
 
ASUS EZ Flash completed the update and restarted the computer.
 
On the next startup, the American Megatrends POST screen displayed:
 
ASUS PRIME B650M-A AX II ACPI BIOS Revision 3881
 
The update had succeeded.
 
First Boot After the Update
 
The POST screen also showed that the motherboard correctly detected the AMD Ryzen 9 7900X, 32GB of DDR5 memory and the Solidigm NVMe SSD.
 
Because the BIOS settings had been reset, the computer instructed me to press F1 and enter Setup.
 
I entered the BIOS again and verified that BIOS 3881 was installed, the processor and memory were detected, the NVMe SSD was present and Windows Boot Manager was still listed as the boot device.
 
Everything looked correct, so I saved the settings and exited.
 
Windows 11 Loaded Normally
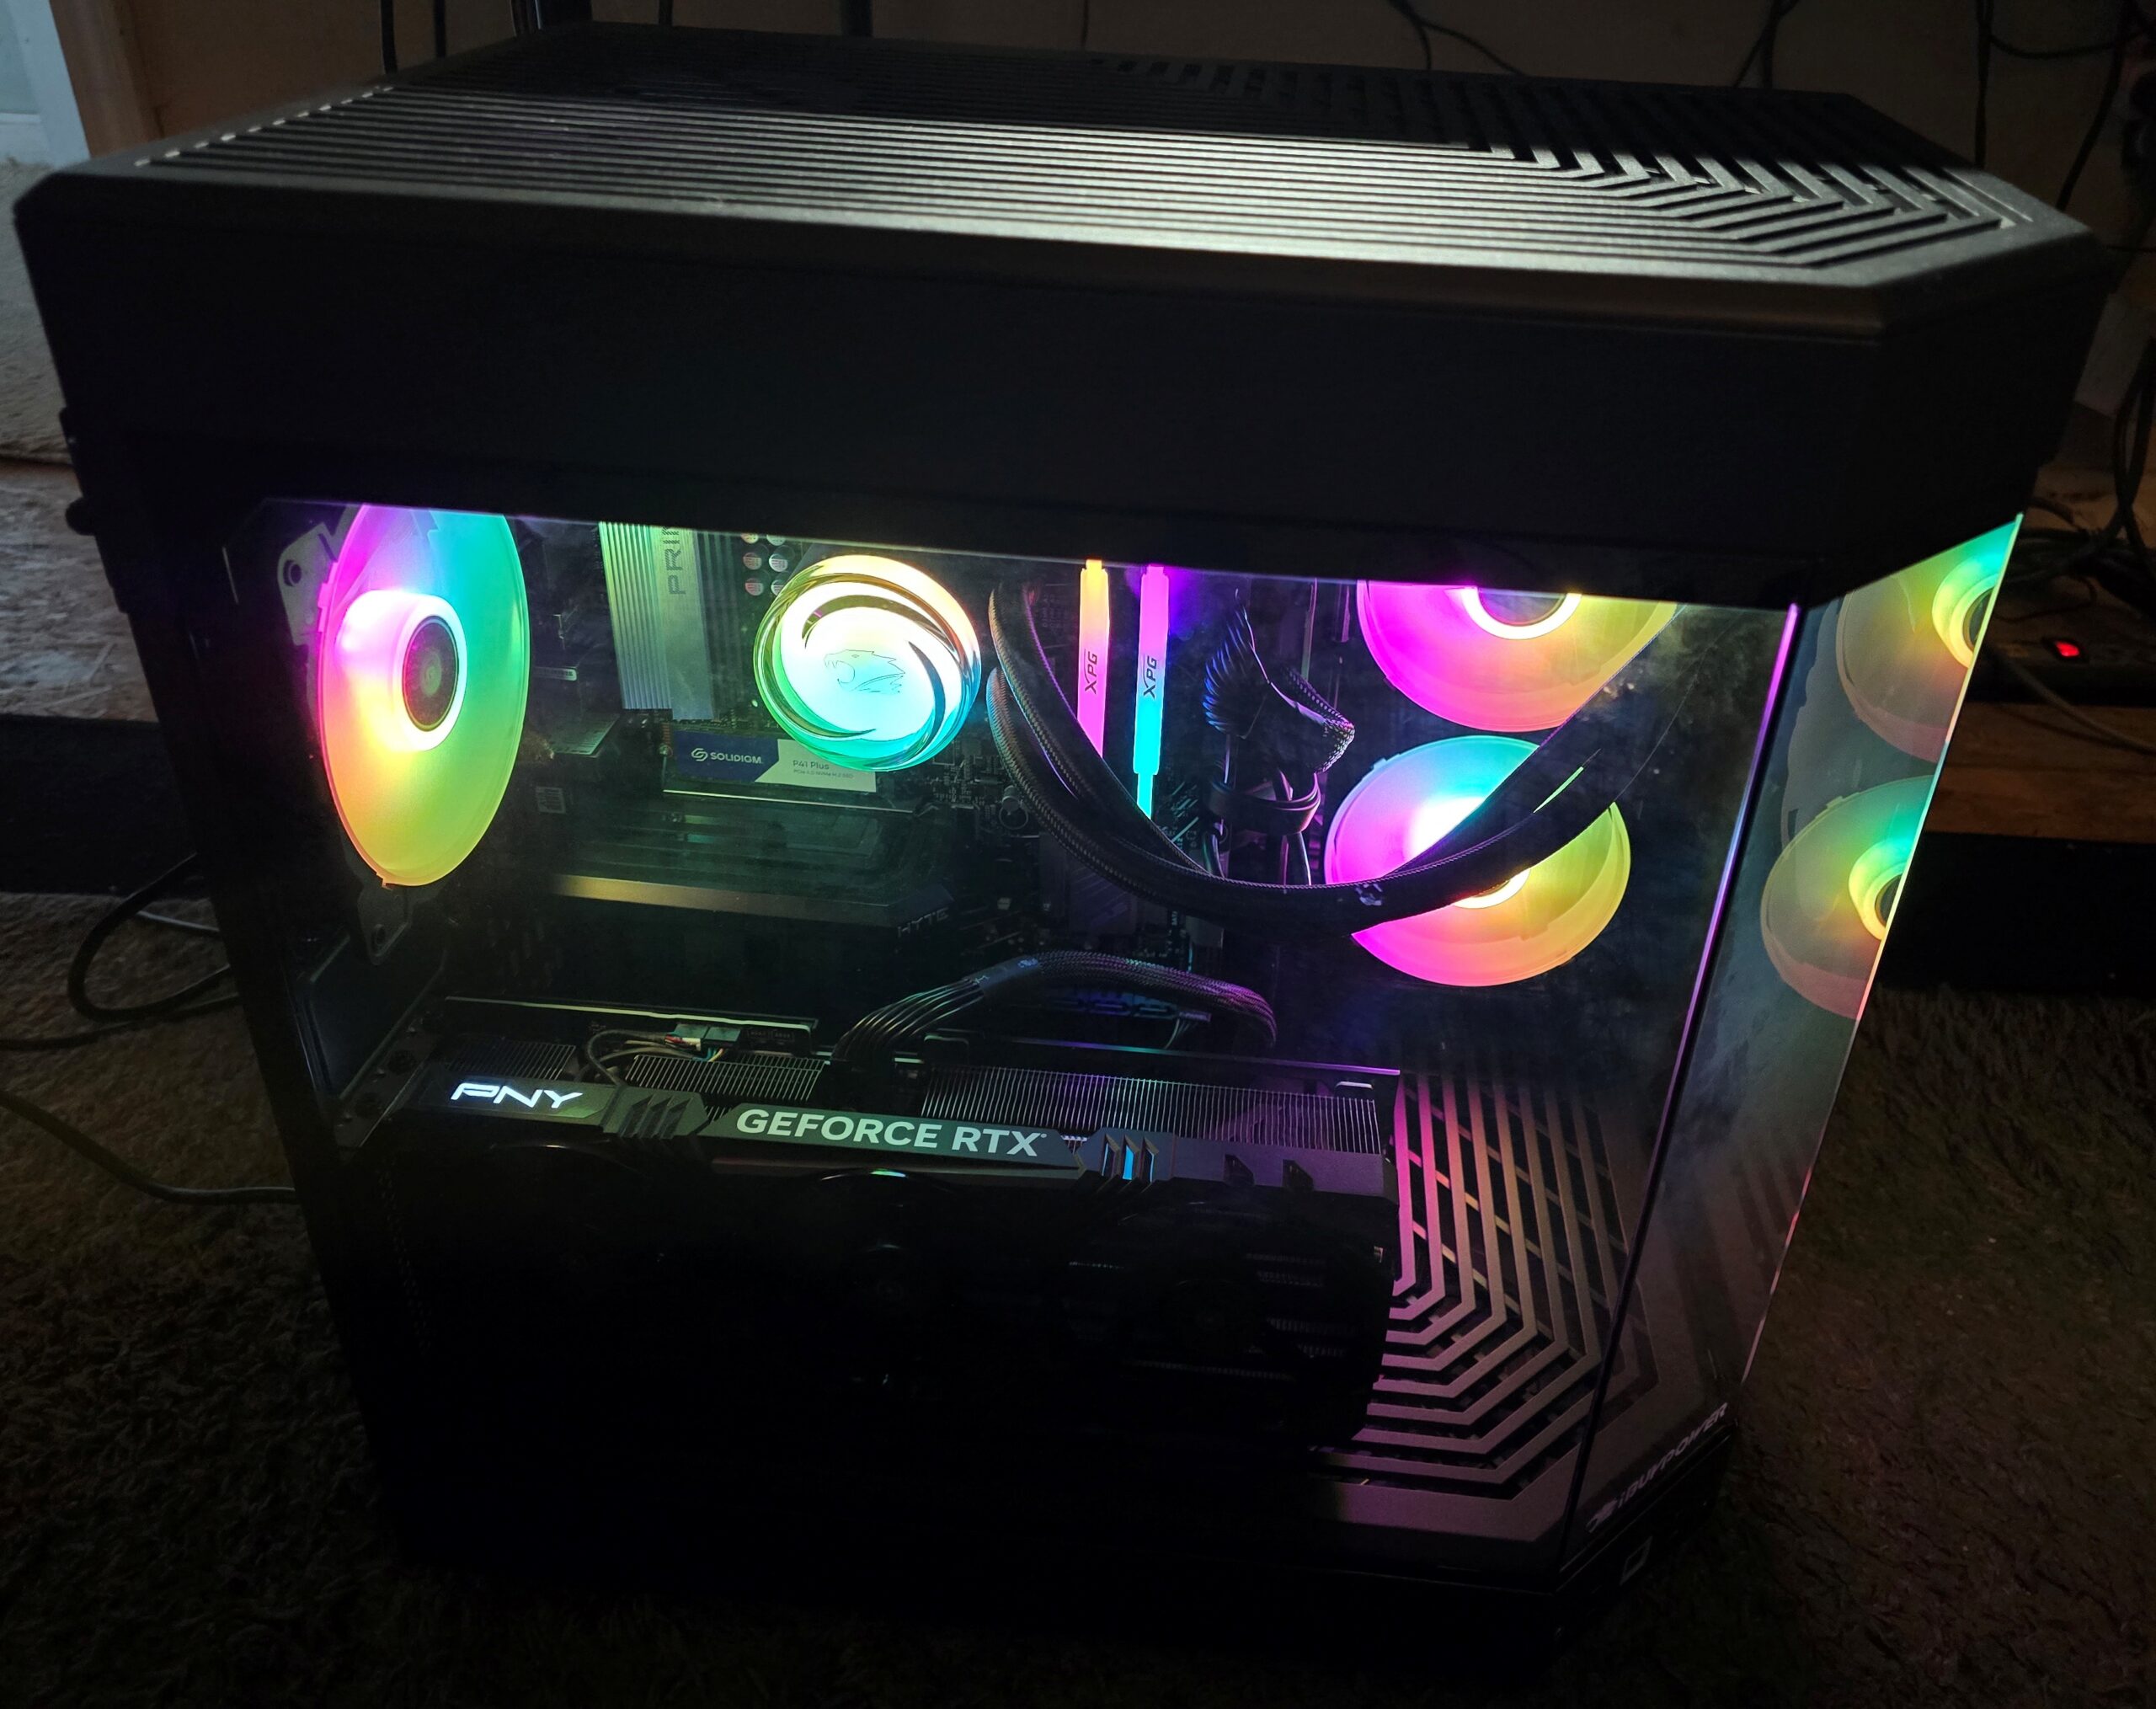
 
The computer restarted and booted directly into Windows 11.
 
There was no BitLocker recovery prompt, no missing boot device and no problem getting Windows to load.
 
At this point I had taken a gaming PC that wouldn’t initially power on from its case controls, manually started it by jumpering the motherboard’s BIOS reset PINS and discovered that its motherboard firmware was more than two years out of date and successfully updated it from BIOS 2413 to BIOS 3881.
 

Chris Calkins owns On-Site Louisville Computer Repair Co. in Louisville, Kentucky, and writes about the computer, networking and cybersecurity problems he encounters on real service calls.
Lock My PC Installed by a Tech Support Scammer – How I Removed It Without the Administrator Password

Problem: Scammers locked a Dell Inspiron 3030 Windows 11 PC with password-protected software so not even Windows could be accessed. Cause: Lock My PC blocked normal access with unknown password, password hint, and also removal. Fix: Backend manual disable and removal. Result: Computer unlocked and usable.

 
I recently worked on a Windows computer after the owner had been involved in a tech support scam. He stated that after he refused to do what scammers expected they put an app on his computer that locked his machine. It was Dell Inspiron 3030 tower with Windows 11.
 
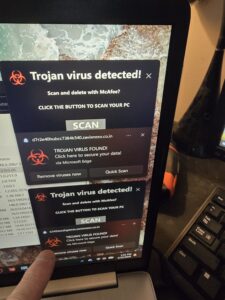
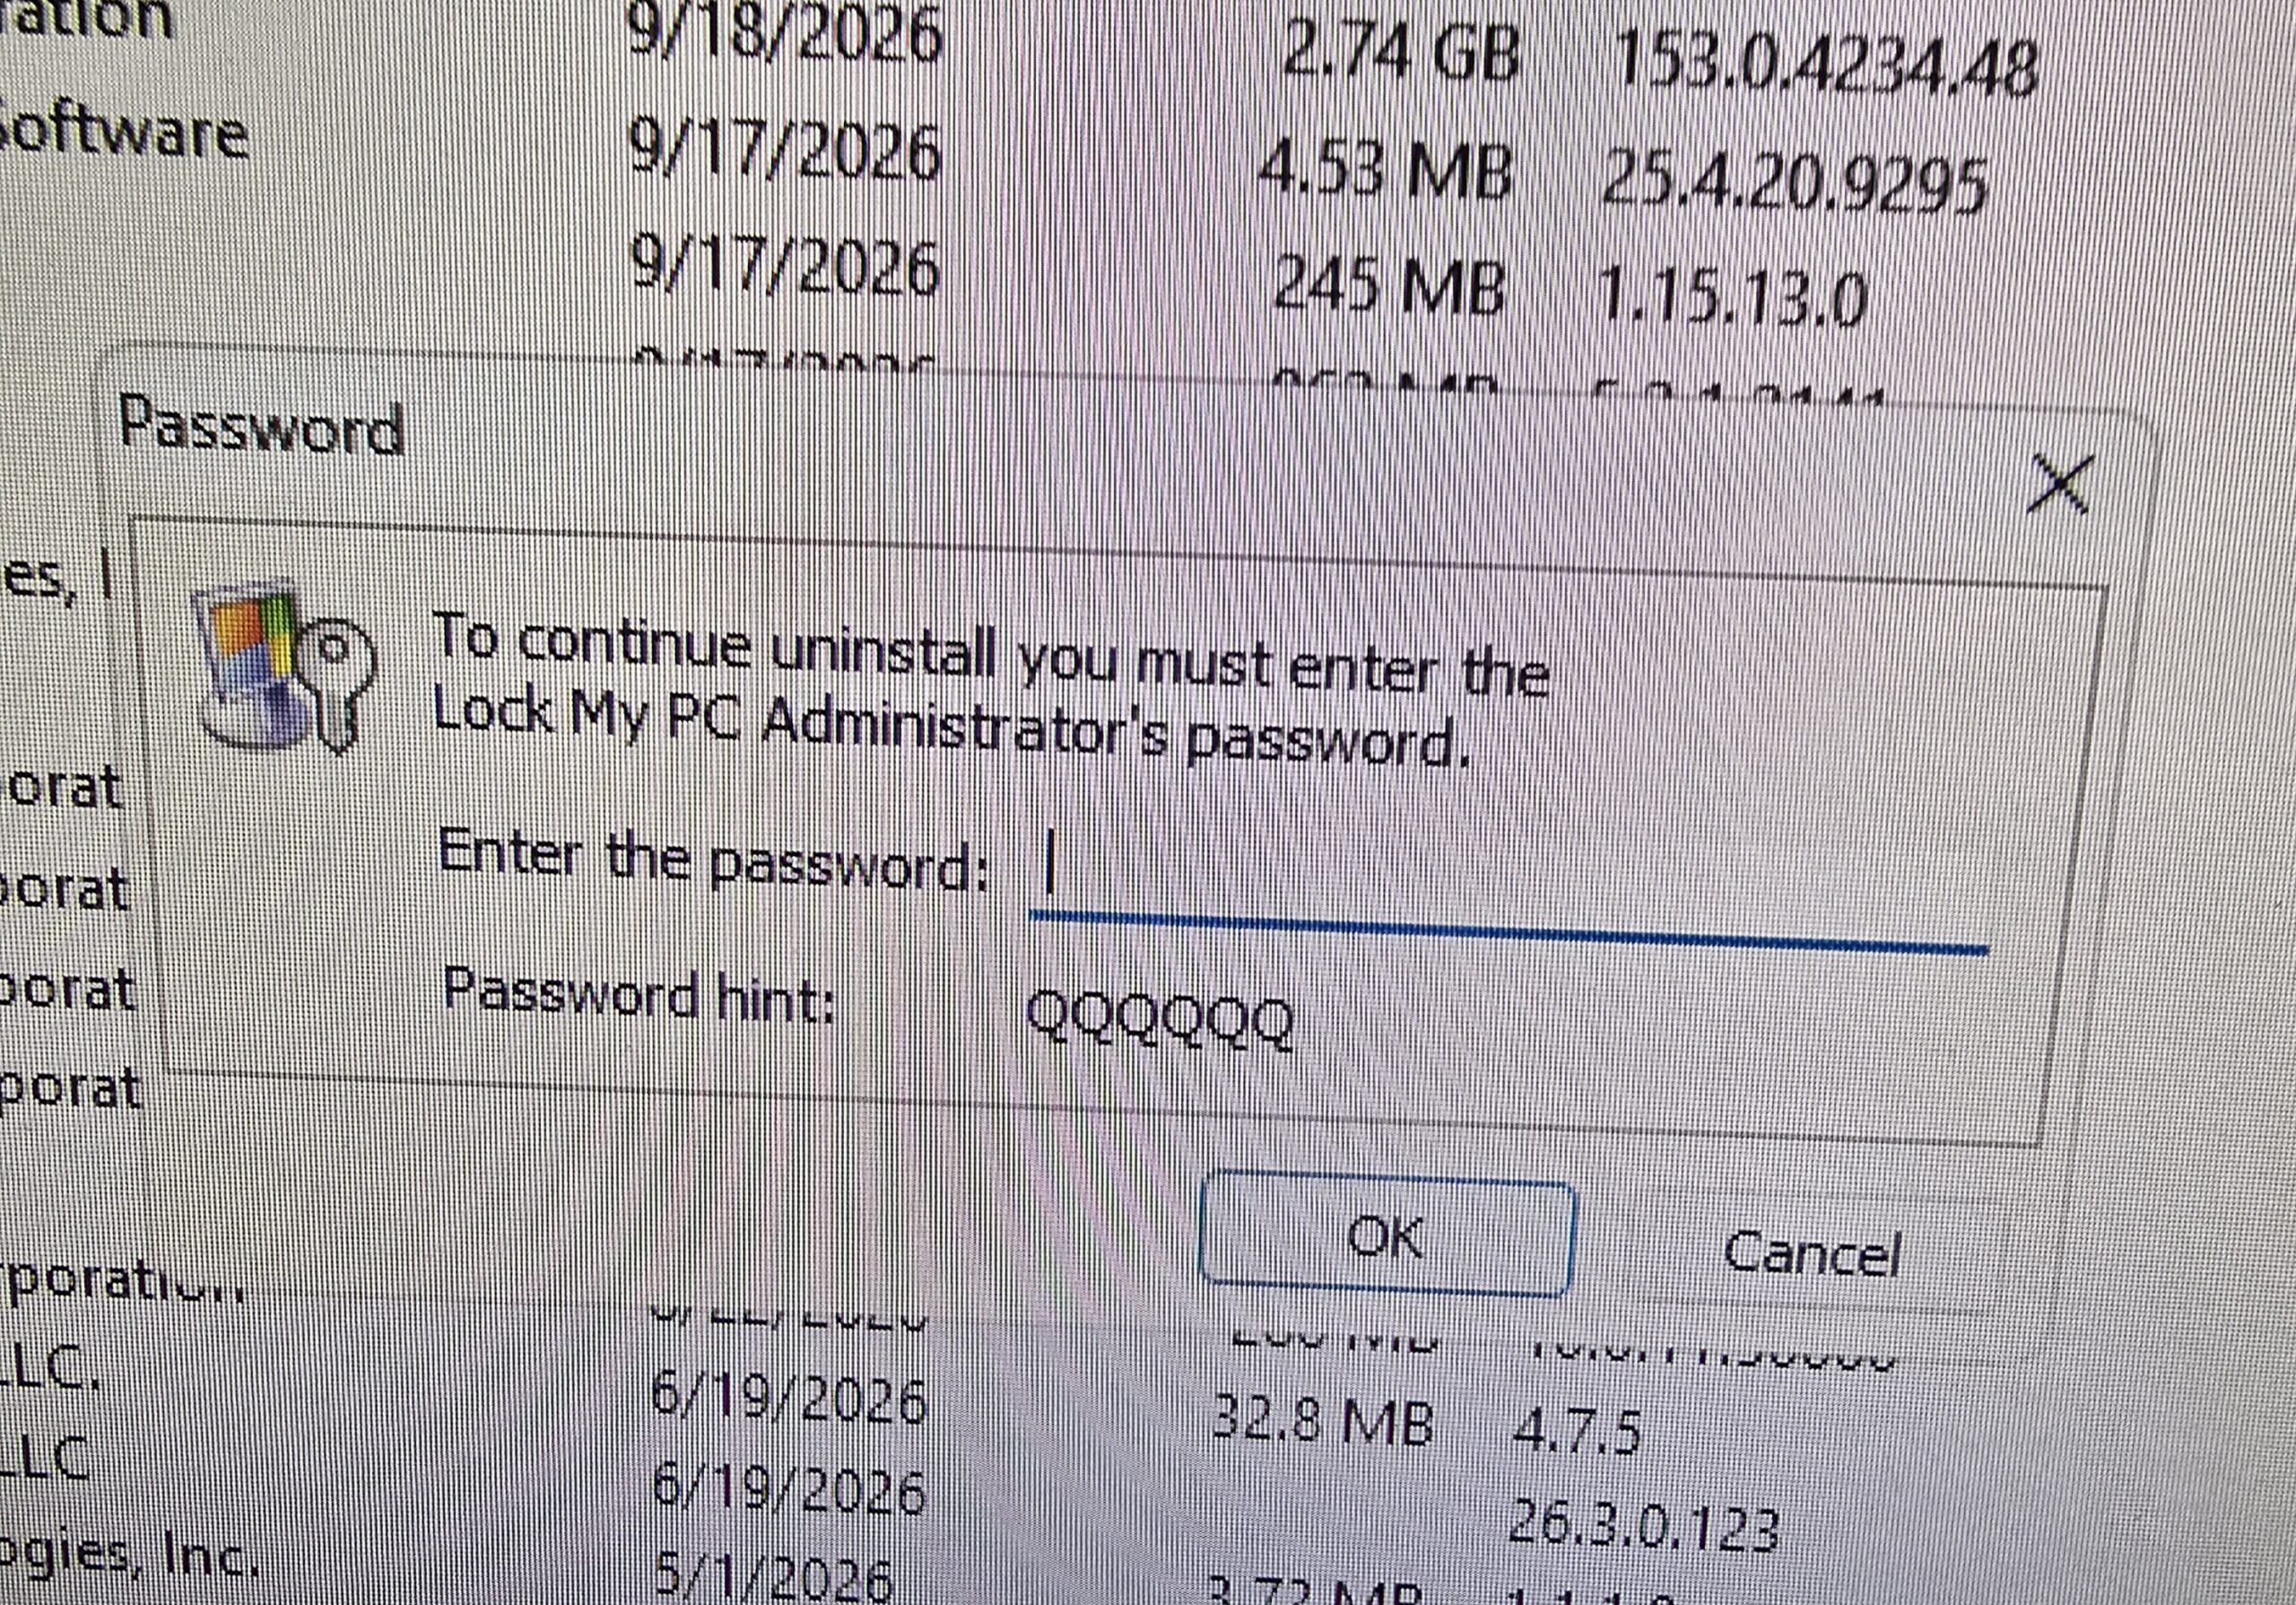
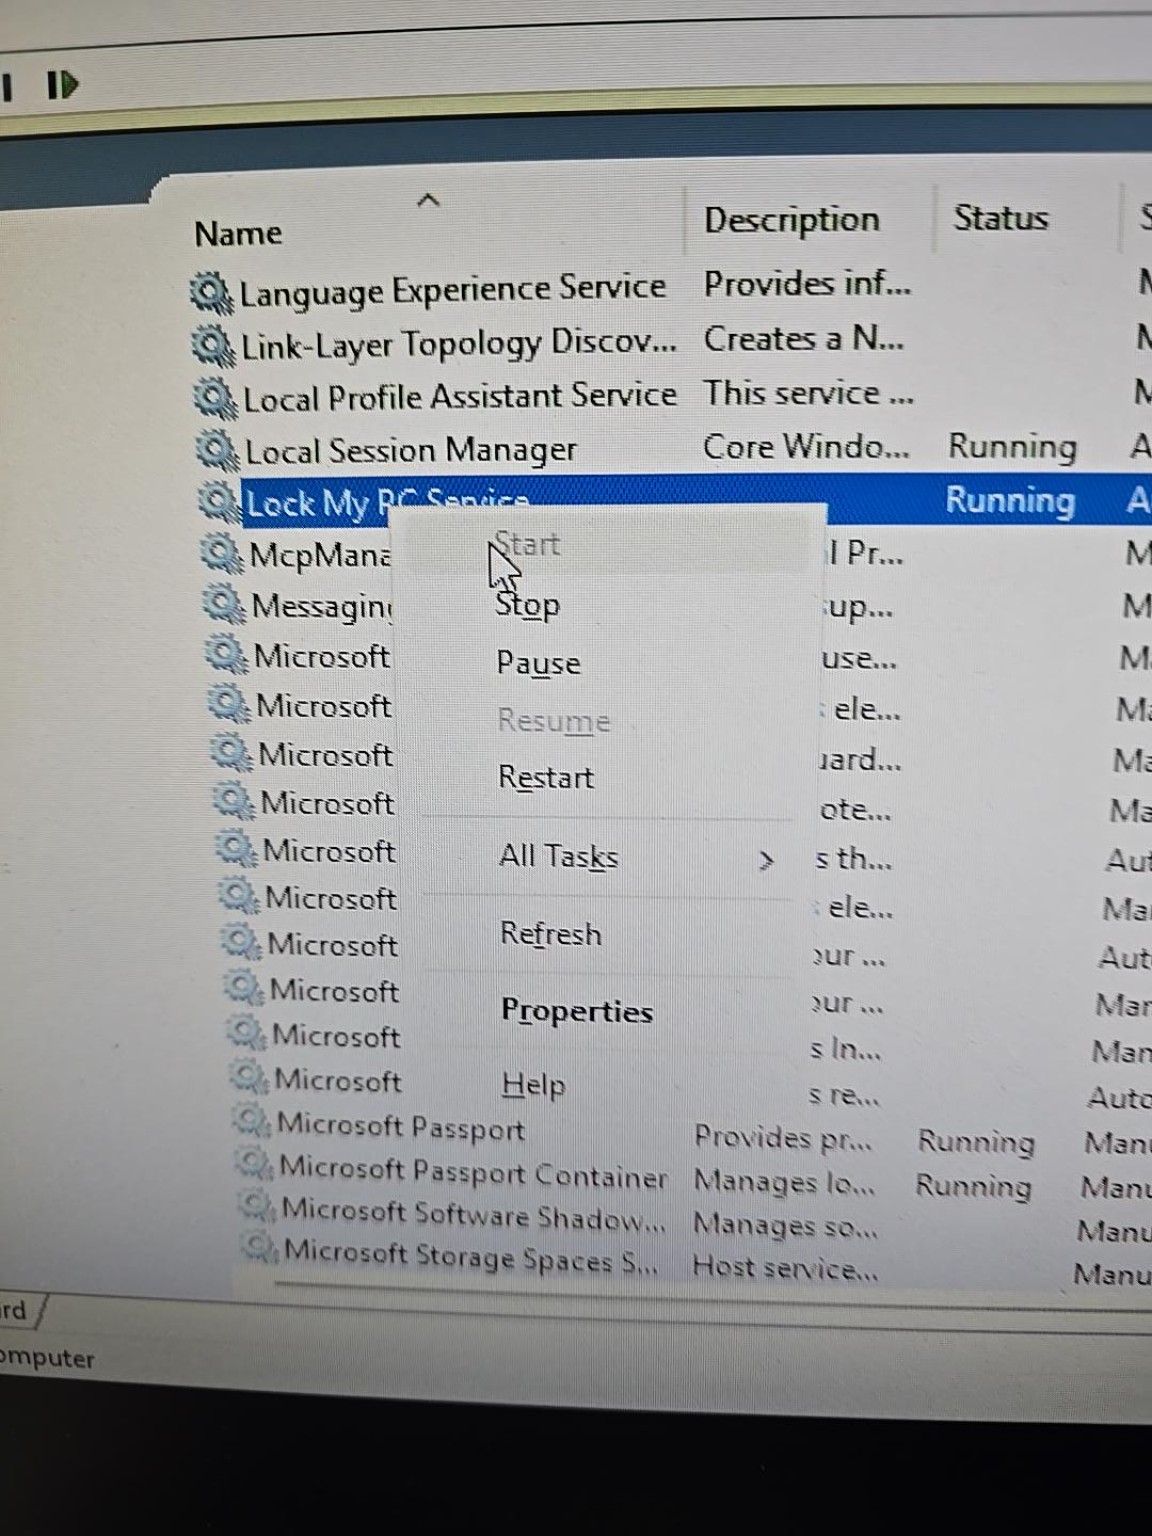
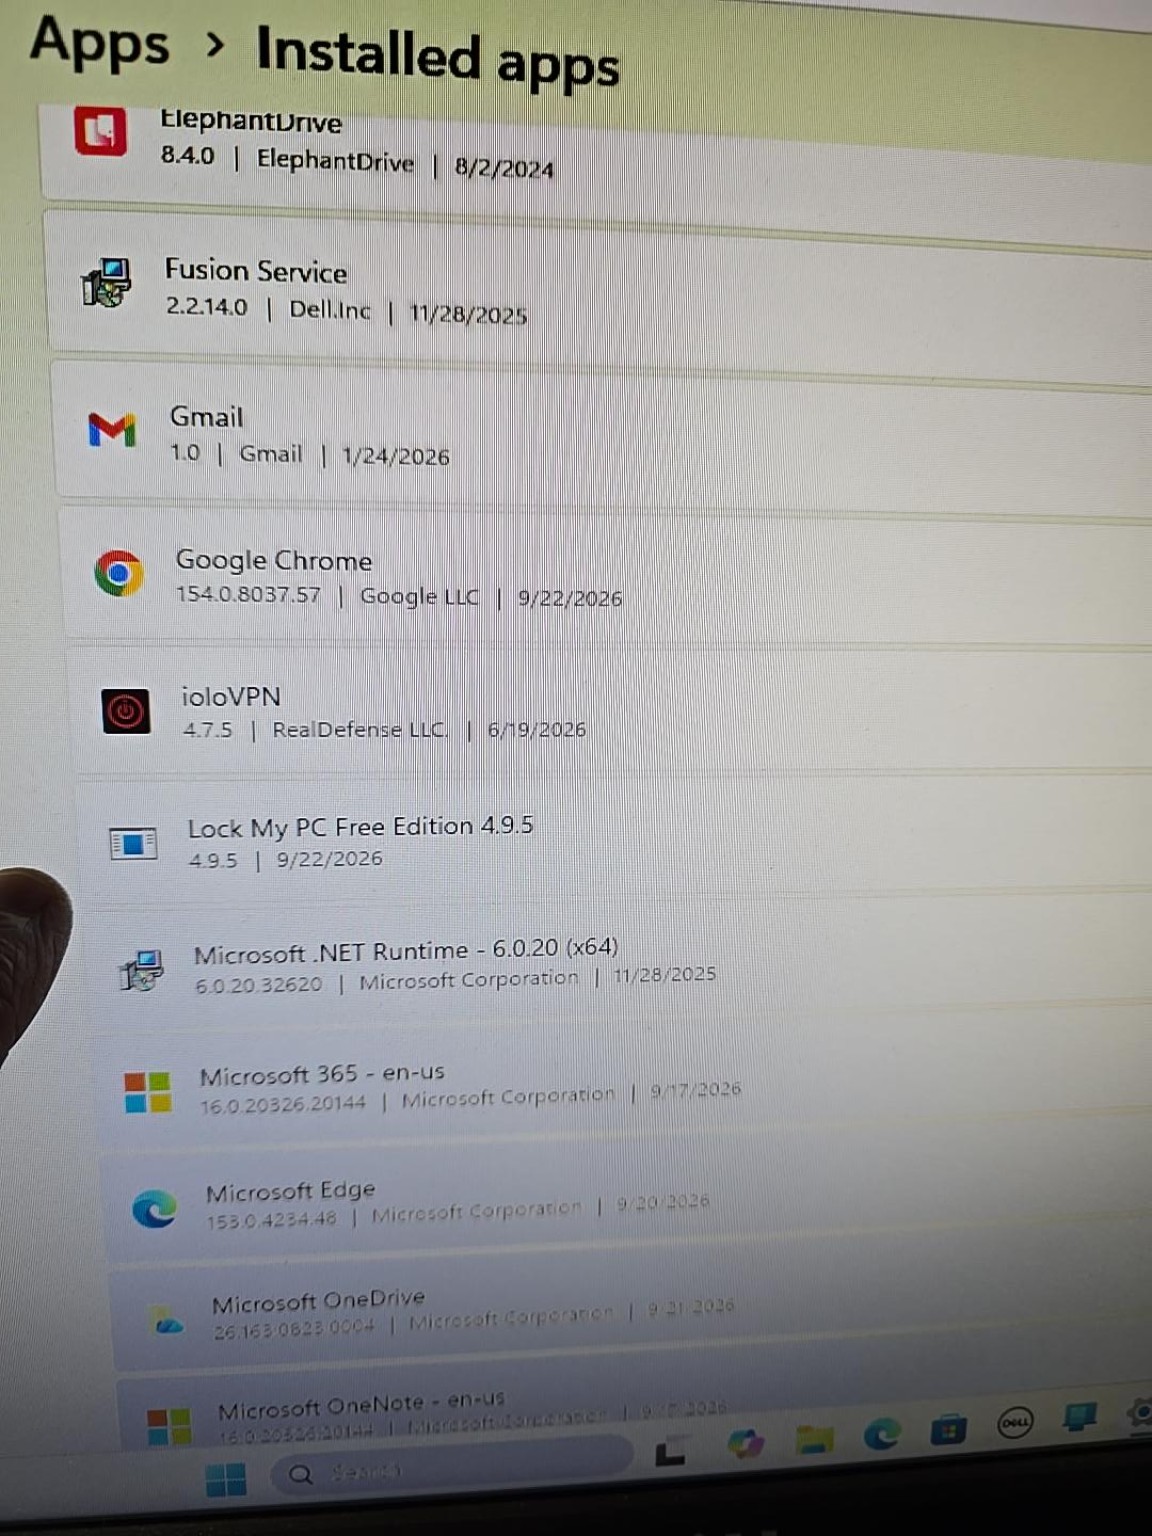
When I arrived on-site the scammer had installed Lock My PC Free Edition 4.9.5. You can see the image above I took as soon as I arrived. The program was password protected, which created an additional problem during cleanup: I couldn’t simply uninstall it.
 
When I attempted to remove Lock My PC through Windows Installed Apps, the uninstaller displayed: “To continue uninstall, you must enter the Lock My PC Administrator’s password.”
 
There was also a password hint (see photo above it was QQQQQQ I think), but the computer’s owner hadn’t installed or configured the program and obviously didn’t know the password the scammer had used. I tried the usual stuff “123456” etc. Nothing worked.
 
Rather than trying to guess the password further I tried to remove it with normal windows uninstaller which failed. Then, I booted into safe mode and attempted removal. What transpired is next:
 
Booting the Computer Into Safe Mode
 
My first step was to disconnect the computer from the internet and boot Windows into Safe Mode.
 
To get there, I used:
 
Shift + Restart
 
Then after the computer restarts: Troubleshoot → Advanced options → Startup Settings → Restart → Safe Mode
 
I initially hoped that running the uninstaller from Safe Mode might prevent Lock My PC’s protection from loading.
 
It didn’t.
 
Even in Safe Mode, attempting to uninstall Lock My PC produced the same administrator-password request.
 
That told me I needed to find out what Lock My PC was loading in Windows rather than continuing to fight with its uninstaller.
 
Finding the Lock My PC Windows Service
 
I opened:
 
Windows Key + R → services.msc
 
I was looking for anything in the “L’s” related to the software. I found a service named Lock My PC Service. Eureka, that was probably it, I thought.
 
The service was actually running even though Windows was in Safe Mode. That explains why it won’t uninstall either from Windows Settings as a modern app or through the control panal as traditional software is removed. (I tried both).
 
Opening the service’s properties provided the information I needed:
 
Service name: LmpcService
 
Path to executable: C:\Program Files\Lock My PC 4\LmpcServ.exe
 
Startup type: Automatic
 
I stopped the service and changed its Startup Type from Automatic to Disabled.
 
I then tried the normal Lock My PC uninstaller again.
 
It still demanded the administrator password.

So the password requirement wasn’t simply being imposed by the running service. It was part of the program’s uninstall process.
 
Removing the Lock My PC Service Manually
 
From an Administrator Command Prompt, I used:
 

sc stop LmpcService

 
Since I had already stopped the service manually, Windows reported that the service had not been started.
 
I then entered:
 

sc delete LmpcService

 
Windows responded:
 

[SC] DeleteService SUCCESS

 
At this point, the Lock My PC service was no longer registered with Windows.
 
Removing the Lock My PC Program Files
 
Next I went to the installation directory:
 
C:\Program Files\Lock My PC 4
 
The directory contained the Lock My PC executables and supporting files, including LmpcServ, lockpc, LockLib.dll, the LockScreens directory and the unins000 uninstall files.
 
Because the service had already been removed and the password-protected uninstaller wasn’t useful, I removed the Lock My PC installation directory manually.
 
Windows initially reported:
 

Folder In Use – The action can’t be completed because the folder or a file in it is open in another program.

 
That indicated that a Lock My PC component was still loaded in memory.
 
After terminating the remaining Lock My PC process, I was able to delete the entire C:\Program Files\Lock My PC 4 folder.
 
Lock My PC May Still Appear Under Installed Apps
 
After manually removing the program, Lock My PC Free Edition 4.9.5 still appeared in Windows Installed Apps.
 
That doesn’t necessarily mean the program is still installed and functioning.
 
Windows maintains uninstall information separately from the application’s actual program files. Because I deliberately bypassed the password-protected uninstaller, its old uninstall registration remained behind.
 
The important components; the running service and Lock My PC program files had been removed.
 
The orphaned Installed Apps entry can subsequently be cleaned up separately.
 
Removing Lock My PC was only part of the scam cleanup. I would not consider a computer clean simply because Lock My PC was removed.
 
In this case, its presence was evidence that someone who should not have had control of the computer had been able to install software on it.
 
After removing Lock My PC, the next job is determining what else was changed or installed during the scam session.
 
The only other problem I found on the machine was several instances of remote access software the scammers used to access the computer, in this case: AnyDesk, TeamViewer, ScreenConnect/ConnectWise, and UltraViewer, which I removed normally.
 
I also performed a manual inspection for malware and a malware scan until I was satisfied the machine was infection and remote user free.
 

Chris Calkins owns On-Site Louisville Computer Repair Co. in Louisville, Kentucky, and writes about the computer, networking and cybersecurity problems he encounters on real service calls.
Spectrum Askey SBE1V1K Wi-Fi 7 Router: Wi-Fi has Fast Down/Up Speeds – Ethernet has Fast Down/VERY Slow Up Speed

Problem: 900 Mbps down / 3 Mbps up over Ethernet. Cause: Killer E2600 / LSO interaction. Fix: Disable Large Send Offload v2 IPv4 and IPv6. Result: Normal gigabit upload restored.

If your ethernet connection gets full download speed but your upload speed is extremely slow, the problem may not be your internet provider, router, or ethernet cable. Incidentally, this may also apply to other routers even though this post is specfically a remedy for a problem with the Spectrum Askey SBE1V1K WiFi 7 Router.


I recently encountered a strange example after installing a new Wi-Fi 7 router on a symmetrical gigabit internet connection.

The symptoms were:

Ethernet: approximately 900 Mbps download (deemed normal as paying for 1000 so 90% in normal range [I consider normal range considered 70-100% based on thousand of field tests I have personally conducted over >20 years]) but only 3 Mbps upload.Wi-Fi: approximately 900 Mbps download and nearly 1,000 Mbps upload.

At first glance, an upload speed of only 3 Mbps might look like an ISP or router problem. But some further troubleshooting isolated the problem to the ethernet adapter in the Windows PC.

How I Isolated the Problem:

The first important clue was that Wi-Fi worked correctly. The computer could access nearly the full symmetrical gigabit connection wirelessly.

Next, I connected a laptop to the router using ethernet.

The laptop achieved more than 900 Mbps download and 900 Mbps upload.

That essentially eliminated the internet connection, router, and ethernet cable as the primary suspects.

The problem was specific to the desktop computer’s wired network connection.

The Ethernet Adapter:

The affected computer was using a Killer E2600 Gigabit Ethernet Controller.

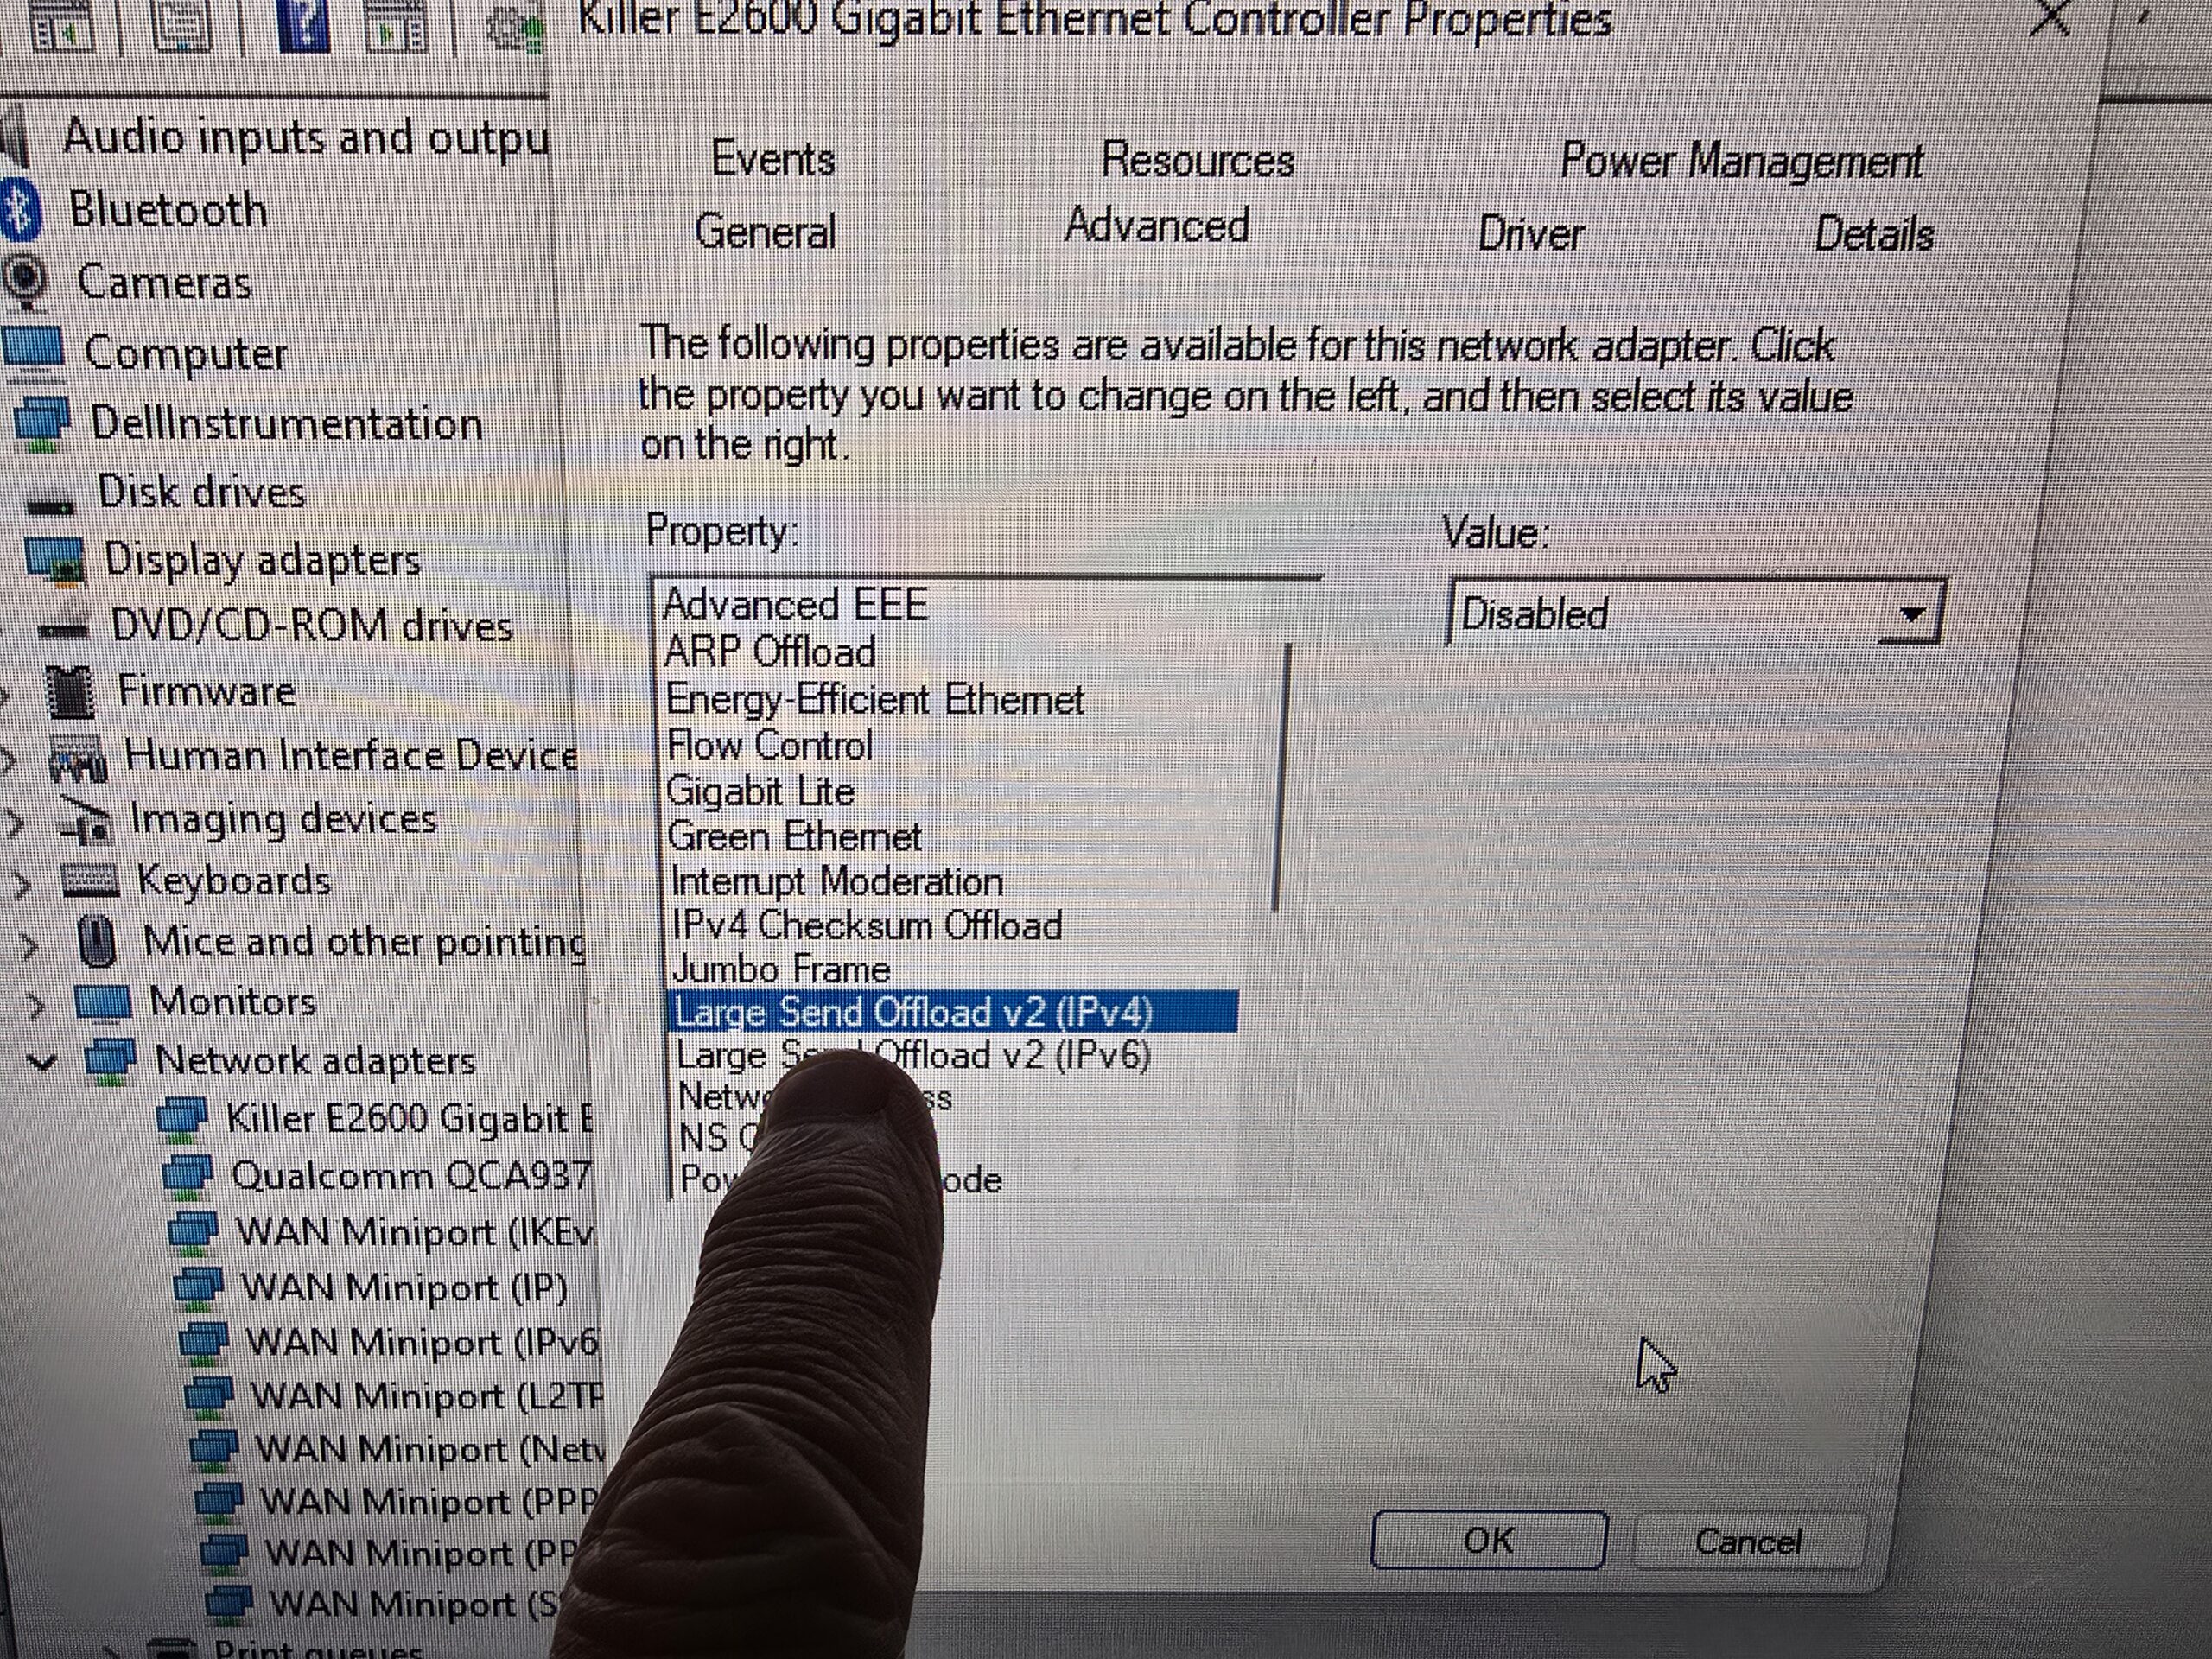
I checked the adapter’s advanced settings in Windows Device Manager.

Energy Efficient Ethernet and Advanced EEE were already disabled, so those weren’t responsible.

The setting that made the difference was Large Send Offload v2 (LSO).

The Fix:

Open:
Device Manager → Network adapters → Ethernet adapter → Properties → Advanced

Locate:
Large Send Offload v2 (IPv4)
Large Send Offload v2 (IPv6)

Set both to:
Disabled

Click OK and allow the ethernet connection to reconnect.

I immediately ran another speed test.

The upload-speed problem was gone.

Instead of approximately 3 Mbps upload, the wired connection was once again capable of taking advantage of the high-speed symmetrical connection.

What Is Large Send Offload?

Large Send Offload is a networking feature designed to reduce CPU workload.

Normally, Windows has to divide large amounts of outgoing network data into smaller packets before transmitting them. LSO allows some of that work to be handed off to the network adapter.

When everything is working correctly, this can improve efficiency.

But network-adapter drivers, hardware, firmware, and networking equipment don’t always interact perfectly. In this case, disabling LSO eliminated an enormous ethernet upload bottleneck.

LSO isn’t inherently bad, and I don’t recommend disabling it on every computer. This is a troubleshooting step for a specific type of networking problem.

How to Tell Whether You Have the Same Problem:

Run a speed test using ehernet.

Run another speed test using Wi-Fi.

If Wi-Fi upload is dramatically faster, connect another computer to the same ethernet cable.

If the second computer gets normal ethernet upload speeds, concentrate your troubleshooting on the original computer.

Check the ethernet adapter’s driver and advanced properties.

As a diagnostic test, disable Large Send Offload v2 for IPv4 and IPv6 and retest.

If nothing changes, you can return the settings to their previous values and continue troubleshooting.

Don’t Automatically Blame Your ISP

This case is a good example of why computer and networking problems need to be isolated systematically.

A connection delivering approximately 1,000 Mbps download but only 3 Mbps upload certainly looked like an internet problem.

But Wi-Fi delivered nearly 1,000 Mbps in both directions, and a second computer delivered more than 900 Mbps in both directions over ethernet.

Those tests narrowed the problem to one computer.

In this case, disabling two Large Send Offload settings in the Windows ethernet adapter immediately solved the problem.

Please feel free to share this post if you found it helpful.
 

Chris Calkins owns On-Site Louisville Computer Repair Co. in Louisville, Kentucky, and writes about the computer, networking and cybersecurity problems he encounters on real service calls.
The 5 Biggest Mistakes That Lead to Virus Infections in 2026

I still meet people who think the only way to get a computer virus is by visiting “those” websites. If that were the main cause, my job would be a whole lot easier. The truth is, most infections today come from much quieter, everyday things that don’t look dangerous at all.

Most of the problems I fix start with someone being tricked—an email that looked real, a pop-up that seemed urgent, or a download that didn’t seem like a big deal at the time. It’s not dramatic hacking; it’s simple deception.

Here are the five mistakes I see the most in 2026.

1. Clicking Fake Security Warnings

You’ve probably run into these before: a bright red box shouting that your computer is infected, sometimes with a loud alarm and a phone number claiming to be Microsoft support. They’re designed to make you panic and react fast.

I get calls about these all the time. They’re not real, and they’re not from Microsoft or Windows. They’re just pop-ups trying to push you into calling a scammer or downloading something harmful.

If one appears, don’t click anything inside it. Close the browser, and if it refuses to close, restart the computer. That usually clears it.

2. Trusting The Wrong Email, Text Message, and Link

Phishing has gotten extremely convincing. I’ve seen fake Amazon emails that look cleaner than the real ones, and fake UPS texts that could fool almost anyone. Criminals know how to make things look official.

If you weren’t expecting the message, don’t click the link. Go directly to the company’s website instead. That one habit alone would prevent a huge amount of trouble.

3. Downloading Software from Unofficial Sources

A lot of infections start with someone searching for a “free version” of a program or a cracked download. Cybercriminals love this because they can hide malware inside whatever you think you’re getting.

I’ve removed viruses that came from fake Chrome updates, free video converters, pirated games, and browser extensions that looked harmless. If you need software, stick to the developer’s website or the Microsoft Store. Anything else is a gamble.

4. Giving Remote Access to Strangers

This one usually happens when someone is stressed or caught off guard. A scammer calls pretending to be Microsoft, Amazon, your bank—whoever—and says there’s a problem with your computer. They sound confident and walk you through installing remote-access software so they can “fix” it.

Once they’re in, they can do anything: install malware, grab passwords, poke around in your accounts, or charge you for fake repairs. It happens more often than people realize.

Real companies do not call you out of the blue about computer issues.

5. Reusing the Same Password Everywhere

This one seems harmless until it isn’t. When a website gets hacked—and it happens constantly—criminals take the stolen email and password and try it on every major site they can think of.

If you reuse passwords, one breach can turn into a whole mess. Using unique passwords for important accounts makes a huge difference, and a password manager makes it much easier to keep track of everything.

Why Antivirus Software Alone Isn’t Enough

Antivirus software is better than ever, and Windows has solid built-in protection now. But antivirus can’t stop you from clicking a fake link or letting a scammer remote into your computer.

Good judgment is still the strongest security tool you have.

What To Do If You Think Your Computer Has Been Infected

If something feels off, here’s what I recommend:

  • Disconnect from the internet if you can.
  • Stop entering passwords or financial information.
  • Run a security scan.
  • Change important passwords from another device.
  • Call your IT person.

Final Thoughts

Most infections I deal with aren’t caused by hackers breaking in. They happen because someone got tricked into clicking something or trusting the wrong message. Staying alert and keeping things updated goes a long way.

If something doesn’t feel right, don’t ignore it. Catching the problem early can save you a lot of time, money, and stress.

[socialring]

How To Fix Wi-Fi Problems In Your Home -2026 Guide

Two big things usually cause people to call me at my computer service company and say they need help with their Wi-Fi: 1. Low signal density (bars) and 2. Low speeds (low Mbps).

Wi-Fi uses short-range radio waves to deliver internet access throughout your home. While it can feel almost “magical,” it’s still bound by physics. Signals weaken over distance, struggle to pass through certain materials, and are easily disrupted by interference. The result is slow speeds, dropped connections, buffering, and frustrating dead zones.

Understanding 2.4 GHz vs 5 GHz

2.4 GHz and 5 GHz Wi-Fi come down to a trade-off between range and speed. 2.4 GHz reaches farther and passes through walls better, but it’s slower and more prone to interference from devices like microwaves, Bluetooth, and nearby networks. 5 GHz, on the other hand, offers faster speeds and less interference, but it has a shorter range and weaker signal through walls.

In general, use 2.4 GHz for devices farther from the router or for basic connectivity, and 5 GHz for faster activities like streaming or gaming when you’re closer to the router.

What is a Dead Zone?

A dead zone is any area of your home where you should have Wi-Fi coverage but don’t, so you have “low signal density.”

What I do as a computer repair technician is walk through the home with a phone, tablet, or laptop and observe your signal strength and speed. You’ll quickly notice where performance drops off. If you have four bars, each bar represents a 25% signal measurement. If you have five bars, each is 20%, right? So you can calculate your drops as you walk through the house. If you are all the way out at your mailbox and you still have four of four bars, you have good signal density.

What Causes Low Signal Density or Poor Mbps Download Speeds?

  • Your home is large: Bigger homes, multi-story layouts, and long floor plans are difficult to cover with a single router, especially if it’s located in one corner or tucked away. Often you need an upgraded router if you have over 3,500 square feet.
  • Building materials block signals: Certain materials absorb or reflect Wi-Fi signals, including plaster walls such as those in older homes or those with wire mesh, brick, concrete, stone, metal, and even large mirrors or aquariums.
  • Electronic interference is everywhere: Common sources of interference include microwaves, baby monitors, wireless security systems, Bluetooth devices, and older cordless phones. In today’s homes, the number of connected devices has increased dramatically, adding more congestion.
  • Network congestion in your area: If you live in a neighborhood with many nearby networks, overlapping Wi-Fi signals can slow your connection due to channel interference.
  • Your router is outdated or failing: Older routers often can’t keep up with modern demands like streaming, gaming, video calls, and smart home devices. Hardware can also degrade over time and cause inconsistent performance.
  • Your internet provider may be the issue: Sometimes the problem isn’t inside your home. Issues with your modem, wiring, or ISP can result in slow or unstable service. So sometimes it can be a problem outside of the house.
  • You might not be paying for much of a plan: Make sure you’re paying for at least 200 Mbps service from your ISP. Most areas have 1,000 Mbps plans now or even higher. You can test your internet speed here for free.

How To Fix Wi-Fi Dead Zones

  • Reposition your router: Place your router in a central location. Higher is better, so elevate it off the floor, and avoid basements or corners. Proper placement alone can significantly improve coverage.
  • Upgrade to a modern router or mesh system: Mesh Wi-Fi systems are now one of the best solutions for larger homes. They use multiple units to create consistent coverage throughout the house. Upgrading to Wi-Fi 6 or newer can make a noticeable difference.
  • Reduce interference and optimize placement: Keep your router away from large metal objects and other electronics. Use less congested channels and take advantage of 5 GHz or 6 GHz bands when available.
  • Use Ethernet where possible: Wired connections provide the fastest and most stable performance. This is especially useful for desktops, TVs, and gaming systems.
  • Test your internet speed and equipment: Run a speed test directly from your modem and compare it to your Wi-Fi speeds. Restart your equipment and make sure your modem supports your current internet plan.
  • Upgrade your plan: Make sure you’re paying for at least 200 Mbps service from your ISP. Most areas have 1,000 Mbps plans now or even higher.

Wi-Fi dead zones are extremely common, especially in larger or older homes, but they can almost always be fixed. Sometimes the solution is simple, like moving your router, and other times it may require upgraded equipment or a better network layout. Either way, improving your Wi-Fi setup can make your entire home faster, more reliable, and far less frustrating to use.

[socialring]

© 2026 All rights reserved. On-Site Louisville Computer Repair Co. | Follow us on: Google Maps | Facebook | Twitter | YouTube | LinkedIn