 Technology has become an integral part of our daily lives, but its complex vocabulary can sometimes be overwhelming and confusing. We often encounter unfamiliar terms and acronyms that leave us scratching our heads. To help demystify the jargon, here’s a glossary of common computer terms that everyone should know.
1. Operating System (OS): Software that manages computer hardware and software resources and provides common services for computer programs. Examples include Windows, macOS, and Linux.
2. Browser: A software application used to access and view websites on the internet. Popular browsers include Google Chrome, Mozilla Firefox, and Apple Safari.
3. Firewall: A network security system that monitors and controls incoming and outgoing network traffic based on predetermined security rules. It acts as a barrier between a trusted internal network and an untrusted external network, such as the internet.
4. Cloud Computing: The delivery of computing services—including servers, storage, databases, networking, software, and analytics—over the internet (“the cloud”) to offer faster, more flexible, and scalable resources.
5. Cookies: Small pieces of data sent from a website and stored on a user’s computer by the user’s web browser while the user is browsing. Cookies are used to remember state information or to record the user’s browsing activity.
6. Virus: A type of malicious software program that, when executed, replicates by modifying other computer programs and inserting its own code. Viruses can cause harm to a computer system, such as corrupting data or stealing personal information.
7. Router: A networking device that forwards data packets between computer networks. Routers perform the traffic directing functions on the internet by sending data to its intended destination based on the IP address and other routing information.
8. RAM (Random Access Memory): A form of computer memory that can be read and changed in any order, typically used to store data temporarily while a computer is running. In simple terms, RAM is what allows a computer to multitask and run programs efficiently.
9. URL (Uniform Resource Locator): The address used to access resources on the internet, such as a website or a file. A URL indicates the protocol used to access the resource, the location of the server, and the specific file or resource being accessed.
10. Encryption: The process of converting information into a code to prevent unauthorized access. Encryption protects sensitive data by rendering it unreadable to anyone without the necessary decryption key.
11. Bluetooth: A wireless technology standard for exchanging data over short distances from fixed and mobile devices, creating personal area networks (PANs). It is commonly used for connecting devices such as smartphones, headphones, and speakers.
12. Cache: A hardware or software component that stores data so that future requests for that data can be served faster. Caching can significantly improve the performance and responsiveness of a system.
13. Ethernet: A system for connecting a number of computer systems to form a local area network (LAN), with protocols to control the passing of information and to avoid simultaneous transmission by two or more systems.
14. HTML (Hypertext Markup Language): The standard markup language for documents designed to be displayed in a web browser. It can be assisted by technologies such as Cascading Style Sheets (CSS) and scripting languages such as JavaScript.
15. VPN (Virtual Private Network): A secure and private connection that enables users to send and receive data across shared or public networks as if their computing devices were directly connected to a private network. VPNs are commonly used to protect online privacy and secure internet connections, especially when using public Wi-Fi networks.
Understanding these common computer terms can empower individuals to navigate and comprehend the world of technology more confidently. As technology continues to evolve, having a foundational understanding of these terms will help bridge the gap between the tech-savvy and those less familiar with the fast-paced and ever-changing landscape of digital innovation.
When Buying A New PC Do Not Focus On Intel i3, i5, or i7 Designation
 When it comes to choosing a new computer or laptop, the processor is often one of the most important factors to consider. Intel’s processors, particularly the i3, i5, and i7 series, are some of the most popular and widely used in the industry. However, many people overlook the significance of the numbers that come after these designations, which actually represent the generation of the processor. Focusing on the generation of the processor is crucial for several reasons.
First and foremost, the generation of the processor tells you the age. I’ve noticed recently especially on Amazon people are trying to pass off computers as new that are acutally “renewed” or used or have NOS (new old stock) parts in them. Hey, there is nothing wrong with a 8th Gen i7, or 9th Gen, it’s just important to know that it is not the same as a 12th gen. If you’re buying it on Amazon or Ebay and it’s a 8th gen something is up.
In addition, the generation of the processor can also affect its compatibility with other hardware and software. Newer generations of processors often come with updated architectures and instruction sets, which can lead to better compatibility with the latest hardware components and software applications. This is particularly important for tasks such as gaming, video editing, and 3D rendering, where compatibility and performance capabilities are critical.
Furthermore, focusing on the generation of the processor is essential for future-proofing your investment. By choosing a newer generation processor, you can ensure that your computer or laptop will remain relevant and capable for a longer period of time. This is particularly important for those who rely on their devices for demanding tasks or for professional use, as the performance gap between newer and older generation processors continues to widen over time.
It’s also worth noting that newer generations of processors often come with enhanced security features, which can be crucial for protecting sensitive data and maintaining the integrity of your system. As cyber threats continue to evolve and become more sophisticated, having a processor with the latest security capabilities is essential for safeguarding your digital assets and privacy.
In conclusion, the numbers that come after Intel’s i3, i5, and i7 designations represent the generation of the processor, and focusing on these numbers is crucial for ensuring optimal performance, compatibility, and future-proofing. Whether you are in the market for a new computer or looking to upgrade your existing one, considering the generation of the processor is an important factor in making an informed and effective decision. By staying informed about the latest advancements in processor technology, you can ensure that you are getting the best possible performance and features from your device.
If you need help buying a new PC in Louisville Kentucky or surrounding areas feel free to give me a call at (502)963-3981
[socialring]
How to Uninstall McAfee Antivirus on Windows 11
 McAfee antivirus software may need to be removed for various reasons. Not the least of which it causes dysfunction in your software environment, acts like a virus itself and slows your computer down to a crawl.
Here’s a step-by-step guide on how to uninstall McAfee from your Windows 11 system:
Step 1: Access Settings
Click on the Start Menu located at the bottom left corner of your screen.
Select the gear-shaped Settings icon to open the Settings menu.
Step 2: Open Apps
In the Settings menu, select Apps from the list on the left-hand side.
Step 3: Locate McAfee Software
Scroll down the list under “Apps & features” to find the McAfee antivirus software.
Click on the McAfee application to reveal the options.
Step 4: Uninstall McAfee
After selecting McAfee, a submenu will appear. Click on the Uninstall button.
Step 5: Confirmation Prompt
A confirmation prompt will appear asking if you want to allow this app to make changes to your device. Click Yes to proceed with the uninstallation.
Step 6: McAfee Uninstallation Process
The McAfee uninstaller will open. Follow the on-screen instructions to complete the uninstallation process. This may involve confirming your choice and waiting for the software to be removed from your system.
Step 7: Reboot Your System (if prompted)
After the uninstallation is complete, you may be prompted to restart your computer. If so, click on the Restart Now button to reboot your system.
Step 8: Verify McAfee is Uninstalled
Once your system restarts, check the Apps list in Settings again to ensure McAfee is no longer listed among your installed applications.
Congratulations! You’ve successfully uninstalled this garbage from your Windows 11 computer.
[socialring]
Does the Dell XPS 8940 Support Gen 5 M.2 Drives?
Recently, I got this question from a client. No, the Dell XPS 8950 desktop computer does not support Gen 5 M.2 PCIe SSDs. The motherboard in the XPS 8950 is the Dell Z960, which only supports up to Gen 4 PCIe. This means that while you can use a Gen 4 M.2 PCIe SSD in your XPS 8950, you will not be able to take advantage of the faster speeds that Gen 5 SSDs offer.Here are some resources that confirm this:
Dell XPS 8950 Manual: The manual for the XPS 8950 states that the M.2 slots support PCIe Gen 3 x4 and PCIe Gen 4 x4 SSDs, but makes no mention of Gen 5 support.
Dell XPS 8950 Specifications: The specifications page for the XPS 8950 on the Dell website also lists the M.2 slots as supporting PCIe Gen 3 x4 and PCIe Gen 4 x4 SSDs.
Dell Community Forum: There is a thread on the Dell Community Forum where users have discussed the fact that the XPS 8950 does not support Gen 5 M.2 PCIe SSDs.
If you are looking for a desktop computer that supports Gen 5 M.2 PCIe SSDs, you will need to choose a different model. Some newer Dell XPS models, such as the XPS 8960, do support Gen 5 M.2 PCIe SSDs.
What is Bitlocker and How to Turn It Off?
 BitLocker is a security feature in Windows that allows you to encrypt your hard drive to protect your data from unauthorized access. When you enable BitLocker, you are required to generate a recovery key to unlock your encrypted drive in case you forget the password or encounter a system failure. The problem is you usually only encrypt the data against yourself. TURN IT OFF. Unless you’re in the FBI or a top secret industry and usually even then it’s only going to cause you a problem later on.
Here’s a guide on how to turn off BitLocker encryption:
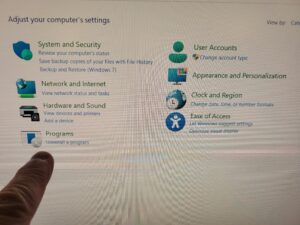
1. Open the Control Panel: Click on the Start button and select Control Panel from the menu. Alternatively, you can search for Control Panel in the Windows search bar.
2. Click on “System and Security”: In the Control Panel, click on “System and Security” to access the BitLocker Drive Encryption settings.
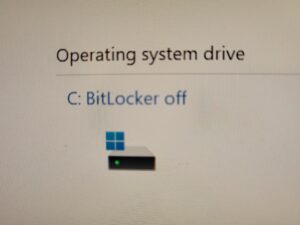
3. Turn off BitLocker: Under the BitLocker Drive Encryption section, you’ll see an option to “Turn off BitLocker.” Click on this option to begin the process of turning off the encryption.
4. Enter the recovery key: If prompted, you will need to enter the recovery key that you created when you initially set up BitLocker. This key is crucial for unlocking the encrypted drive when BitLocker is turned off.
5. Turn off BitLocker for the drive: After providing the recovery key, you will be given the option to turn off BitLocker for the selected drive. Select the drive that you want to disable BitLocker for and click “Turn off BitLocker.”
6. Confirm turning off BitLocker: You will then be prompted to confirm the action of turning off BitLocker encryption. Click “Decrypt the drive” to confirm and initiate the process of decrypting the drive.
7. Wait for decryption: Depending on the size and speed of your drive, the decryption process may take some time. It’s important not to interrupt this process, as doing so could result in data loss or corruption.
Once the decryption process is complete, your drive will no longer be encrypted with BitLocker. You will no longer need to enter your recovery key to access your files, and the encryption key will be turned off.
[socialring]

RSS Feed
